
SMOK Vape Maintenance Tips: A 2026 Guide
Table of Contents
- Why SMOK Vape Maintenance Matters
- Step-by-Step Guide to Disassembling Your SMOK Device
- Cleaning Your SMOK Tank and Pod Components
- SMOK Coil Replacement Frequency and Best Practices
- Troubleshooting SMOK Vape Leaking Issues
- SMOK Vape Battery Safety Tips
- Long-Term Storage Protocols for SMOK Devices
- Conclusion
Last Updated: August 23, 2026
Why SMOK Vape Maintenance Matters
Proper smok vape maintenance extends device lifespan, ensures consistent performance, and avoids costly repairs. When you neglect maintenance, residue buildup from vegetable glycerin and propylene glycol accumulates inside your tank and coil, affecting flavor quality and vapor production. Over time, these deposits reduce airflow, create dry hits, and can cause leaking that damages your battery. A consistent maintenance schedule prevents most common vaping problems before they start. Whether you own a SMOK Nord 5, NFIX Pro, or Novo 5 kit, the fundamental principles remain the same.

Step-by-Step Guide to Disassembling Your SMOK Device
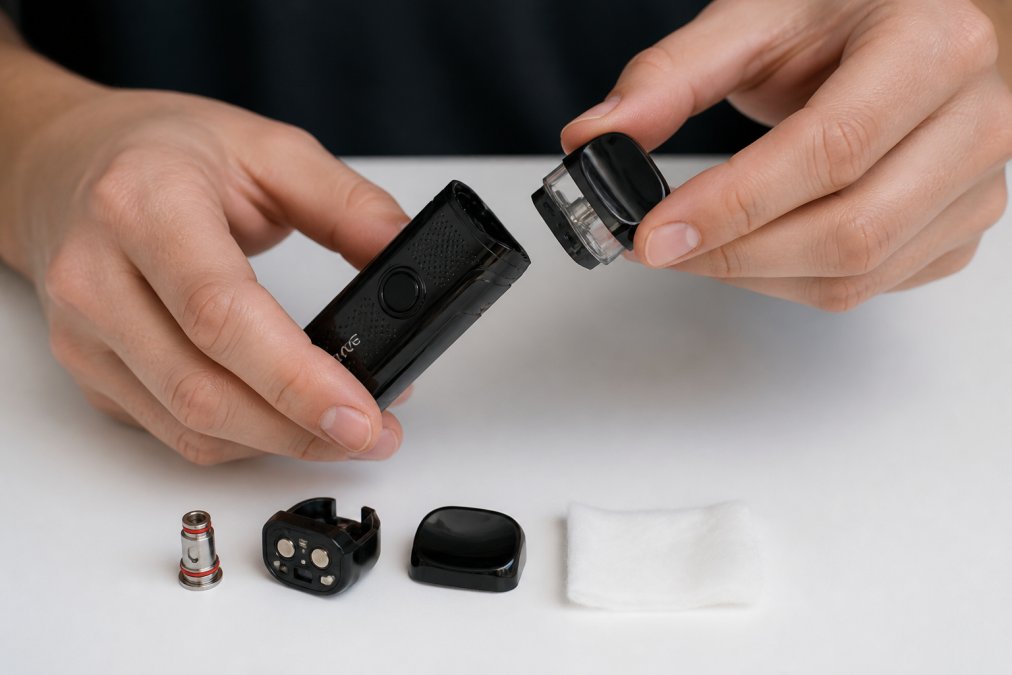
Before cleaning your device effectively, you need to safely disassemble it. Every SMOK pod system follows similar logic, though specific models vary slightly.
Removing the Pod or Tank
Start by powering off your device completely. Most SMOK systems require pressing the power button five times rapidly to deactivate. This prevents accidental firing during disassembly and protects your battery.
Locate where your pod or tank connects to the battery unit. For SMOK Nord systems, this is a magnetic connection at the top. Gently pull the pod straight upward with steady, even pressure. Don't twist or angle it. If it resists, wait a few seconds and try again.
Once the pod separates, set the battery unit aside on a clean surface. Examine the connection points on both pieces for any visible e-liquid residue or debris, as these contact points are critical for proper power delivery.
Separating Internal Components
Inside your pod, you'll find several removable parts. The coil sits at the bottom and typically pulls straight out with gentle upward pressure. The o-rings, small rubber seals, sit in grooves around the connection point and are crucial for preventing leaks.
The mouthpiece (drip tip) pulls straight up and off on most SMOK pods. Behind it, you may find a small rubber gasket. Keep these pieces together during cleaning. Never force any component; if something doesn't pull free easily, you're likely pulling the wrong direction.
Cleaning Your SMOK Tank and Pod Components
Using inappropriate cleaning methods can damage delicate components or leave residue that affects flavor.
Warm Water Rinsing Technique
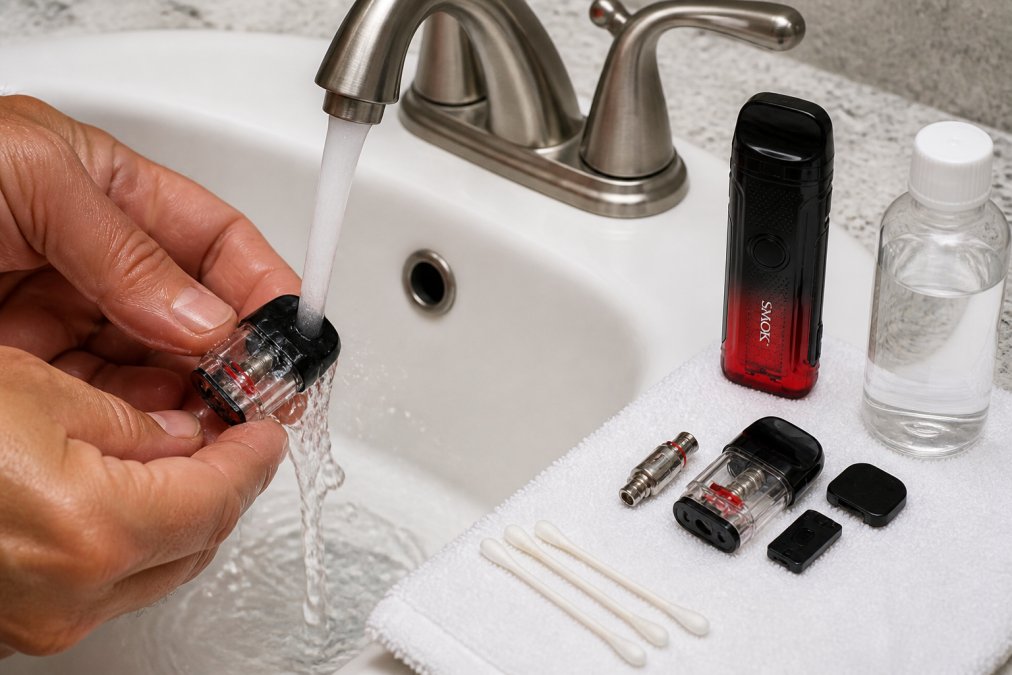
Warm (not hot) water around 40-45°C (104-113°F) dissolves sticky residue without damaging rubber seals or internal components. Submerge your pod components (excluding the coil and battery) for 2-3 minutes. Use a soft cotton swab to gently wipe interior walls, especially around the coil connection point.
Pay special attention to the o-rings, which collect debris and dried e-liquid. A gentle wipe with a damp cotton swab removes most buildup. Rinse the entire pod under running warm water, ensuring all residue washes away completely. Apply the same approach to the mouthpiece and drip tip.
Using Isopropyl Alcohol for Deep Cleaning
When warm water alone isn't enough, isopropyl alcohol (70% concentration) provides deeper cleaning without damaging your device. Soak your pod components in isopropyl alcohol for 5-10 minutes, then use a cotton swab to gently clean interior surfaces. Rinse thoroughly with warm water to remove all alcohol traces.
Never submerge the battery unit or charging port in any liquid. For the battery exterior, use a barely damp cotton swab to wipe away residue, then dry immediately with a clean cloth. Never clean coils with alcohol or water; if gunked up, replacement is the better option.
SMOK Coil Replacement Frequency and Best Practices
Your coil is the heating element that vaporizes e-liquid. Coils have a finite lifespan measured in weeks or months depending on usage.
Signs Your Coil Needs Replacement
A burnt taste that persists after thorough cleaning indicates the cotton wicking has degraded beyond recovery. Reduced vapor production despite a full tank, sudden leaking despite proper assembly, or a persistent dry hit sensation all point to coil degradation. Heavy users might replace coils every 1-2 weeks, moderate users typically get 3-4 weeks, and light users might stretch a coil to 6-8 weeks.
Priming a New Coil Correctly
Installing a new coil without priming causes an immediate burnt taste and potentially damages the coil. After installing your new coil into the pod, fill your tank completely and let it sit for 5-10 minutes to allow e-liquid to soak into the cotton wicking.
Once the wait is complete, take 3-4 gentle draws without firing the heating element, then take 2-3 short, gentle puffs at low power. Gradually increase power over the next 5-10 puffs until you reach your preferred setting. This gradual approach prevents the dry hit sensation that occurs when cotton burns instead of vaporizing liquid.
Troubleshooting SMOK Vape Leaking Issues
Leaking is the most frustrating maintenance problem. Most leaks stem from simple issues you can fix in minutes.
Identifying the Source of Leaks
Liquid leaking from the bottom typically means the seal between pod and battery isn't tight. Remove the pod and inspect connection points on both pieces for debris or residue. Clean both thoroughly with a dry cotton swab.
Leaking from the mouthpiece or top usually indicates the pod is overfilled or internal seals are compromised. Always fill to the line, never above it. Leaking from the bottom of the pod suggests the coil isn't seated properly or is defective. Remove the coil completely, inspect the sealing surface, and reinstall it firmly.
Some leaking is actually condensation buildup inside the device. During normal use, vapor cools and condenses into liquid droplets. Check if the liquid is e-liquid or water condensation by examining color and smell.
Fixing O-Ring and Seal Problems
The rubber o-rings around your coil and connection points are your primary defense against leaking. Over time, these seals deteriorate, shrink slightly, or accumulate debris that prevents a proper seal.
Remove the coil and inspect the o-rings carefully. They should sit snugly in their grooves without gaps. If an o-ring appears cracked, permanently deformed, or missing, replacement is necessary. Most SMOK coils come with spare o-rings. If the o-ring looks intact but the seal isn't working, try removing it and cleaning it with a dry cotton swab, then reinstall it firmly.
For persistent leaking despite new coils and clean o-rings, the pod itself may have internal damage. Replacement pods are affordable and solve the problem completely.
SMOK Vape Battery Safety Tips
Your battery is the most expensive and potentially dangerous component. Proper handling ensures safe operation and extends battery lifespan.
Proper Charging Practices
Always use the original charging cable that came with your SMOK device. Third-party cables may deliver incorrect voltage and damage the battery. Charge in a cool environment away from direct sunlight. Never leave your device charging overnight or unattended for extended periods; most SMOK batteries charge fully in 1-2 hours.
Avoid charging on soft surfaces like beds where heat can't dissipate properly. A hard surface like a desk allows airflow around the device. If your device feels hot during charging, disconnect it immediately. Never charge a visibly damaged battery; dispose of it properly as damaged batteries pose fire and explosion risks.
Battery Storage and Longevity
When storing your device for extended periods, charge it to roughly 50% capacity first. This is the optimal storage charge for lithium batteries. Keep your device in a cool, dry place away from direct sunlight. Check battery connection points monthly during storage; a clean cotton swab removes any corrosion or debris.
If your battery isn't holding a charge as long as it used to, replacement is the solution. SMOK batteries are replaceable on most models, and the cost is far less than replacing the entire device.
Long-Term Storage Protocols for SMOK Devices
Empty your tank completely before storage. Residual e-liquid gums up and becomes harder to clean the longer it sits. Remove the coil from your pod and store it separately in a cool, dry place.
Charge your battery to 50% capacity and store it separately from the pod if possible. This prevents accidental activation and allows each component to be stored in optimal conditions. Place your entire device in a sealed plastic bag or container to protect it from dust and moisture. Store in a cool location, such as a temperature-controlled closet.
Before resuming use after storage, charge your battery fully, install a fresh coil, and prime it properly. Even if your device was stored perfectly, a fresh coil ensures the best flavor and performance from day one.
Proper smok vape maintenance transforms your device into a reliable daily tool. Most maintenance tasks take under 10 minutes, but the payoff in extended device lifespan and consistent performance is substantial. When you're ready to upgrade or need replacement parts, Bay Roberts Vape and Glass Shop stocks authentic SMOK devices including the SMOK Nord 5 Kit and SMOK Novo 5 Kit, plus all the maintenance supplies and replacement coils you'll need. Our team can answer specific questions about your model and ensure you have exactly what you need to keep your device in peak condition.


Frequently Asked Questions
How often should I replace my SMOK vape coil?
Most SMOK coils last 1 to 4 weeks depending on usage frequency and e-liquid type. Replace your coil when you notice reduced flavor, dry hits, or a burnt taste. Heavy vapers may need replacement every 7 to 10 days, while light users can extend coil lifespan to 3 to 4 weeks. Always prime a new coil by letting it soak in e-liquid for 5 to 10 minutes before use.
Why is my SMOK vape leaking and how do I fix it?
Leaking usually results from damaged o-rings, improper pod installation, or overfilled tanks. Check that all components are seated correctly and inspect o-rings for cracks or wear. Ensure you're not filling above the max line. If leaking persists, replace the o-rings or pod cartridge. Store your device upright when not in use to prevent condensation from entering the airflow.
What are the safest ways to charge my SMOK vape battery?
Use the original charger or a certified USB charger designed for your SMOK device. Avoid overcharging by removing the device once fully charged. Never leave batteries charging overnight or unattended. Store batteries in a cool, dry place away from direct heat or moisture. Replace batteries if you notice swelling, discoloration, or reduced capacity.
Can I use isopropyl alcohol to clean my SMOK tank?
Yes, isopropyl alcohol (70% concentration) is safe for cleaning most SMOK tank components and mouthpieces. Soak parts for 5 to 10 minutes, then rinse thoroughly with warm water to remove all alcohol residue. Never submerge electronic components or the battery unit. Allow all parts to air dry completely before reassembling.
This article was written using GrandRanker