
Vape Troubleshooting Tips: Fix Common Device Issues
Table of Contents
- Start With a Symptom Check: What Your Vape Is Telling You
- Vape Not Charging: Battery and Charging Port Checks
- Vape Not Hitting: Diagnosing No Vapor and Weak Draws
- How to Clean a Vape Device: Contacts, Pods, and Airflow
- Vape Leaking: Causes and Fixes for Pod and Tank Devices
- When to Stop Troubleshooting and Replace Your Device
- Prevention and Maintenance Schedule for Your Vape
- Frequently Asked Questions
Last Updated: October 9, 2026
Start With a Symptom Check: What Your Vape Is Telling You
Most vape problems announce themselves early: a blinking light, a weak draw, or residue around the pod. At Bay Roberts Vape and Glass Shop, we walk customers through these signals daily, and the fix is usually simpler than they expect.
Vape troubleshooting means matching a symptom, like a blinking light or weak draw, to its likely cause before replacing parts. A structured approach saves money and keeps you vaping safely.
Blinking Lights and Error Indicators
A blinking light almost always means one of three things: low battery, a poor pod connection, or a short in the coil. Check the charge first, then reseat the pod firmly. If the light still blinks, the coil or pod likely needs replacing.
| Symptom | Likely Cause | First Fix |
|---|---|---|
| Light blinks 3-5 times | Low battery | Charge fully |
| Light blinks constantly | Poor pod contact | Remove and reseat pod |
| Light blinks once on draw | Coil short | Replace coil or pod |
| No light at all | Dead battery or charge fault | Test cable and block |
Vape Not Charging: Battery and Charging Port Checks
When a vape will not charge, the fault is almost always the cable, power block, charging port, battery contacts, or battery cell. Testing them in a fixed order stops you from replacing parts that still work.
Run the five-point charging check in order
- Cable. Swap in a known-good cable. Type-C cables fail at the connector end first, and a cable that still charges a phone can be too worn to carry a vape's current. If the device only charges at an angle, the cable is the fault.
- Power source. Move from a laptop or car USB port to a wall block. A weak USB port may light the indicator without enough current to charge the cell. A wall block rated at least 1A at 5V is the baseline; Power Delivery blocks negotiate the correct rate automatically.
- Charging port. Look into the port with a light. Lint, dust, and dried e-liquid pack into the back and block the pins. Blow it out with dry air or tease it out with a dry, non-metal tool. Never insert anything metal into the port.
- Battery contacts. On pod systems and 510-threaded pens, the battery contact and pod or tank pin must touch cleanly. Wipe both with a dry cotton swab. A dark film is oxidation, adding resistance that can mimic a dead battery.
- Battery cell. Only after the first four checks pass should you suspect the cell. A cell that will not accept charge after a known-good cable and block is at the end of its service life.
What the indicator light is actually telling you
Most devices use a simple light language: steady means charging, off means full or no connection, and flickering means an intermittent connection. On 510-threaded pen batteries, a charger LED shows red while charging and green when full, separating a charger fault from a device fault. If the charger LED stays green with the device attached, the device is not drawing current, go back to the port and contact checks.

Charging habits that shorten battery life
- Do not leave a device on the charger for days. Most cells are happiest between roughly 20% and 80% charge.
- Do not charge in a hot car or direct sun. Heat during charging is the biggest cause of accelerated cell aging.
- Do not charge a wet device. Let it dry fully first.
When to replace the cable, the block, or the device
Replace the cable if the device only charges at a certain angle or the plug feels loose in the port. Replace the block if it runs hot, buzzes, or the port feels loose. Replace the device if the charging port itself is physically damaged, if the body is cracked, or if the battery is swollen. Health Canada advises consumers to stop using and safely dispose of damaged or swollen lithium batteries rather than charging them. Health Canada battery safety guidance
Device-type notes
- Disposable vapes. Sealed and not user-serviceable. If one will not charge, the port is usually clogged or the cell is spent; there is no safe repair.
- Refillable pod systems. The pod base and battery contact are the usual culprits. Reseat the pod and clean both contacts before assuming the battery failed.
- Tank and mod devices. Check the 510 connection and the mod's battery door or cell contacts. On removable-cell mods, a worn wrap or reversed cell stops charging entirely.
Vape Not Hitting: Diagnosing No Vapor and Weak Draws
A vape that is not hitting usually has one of four problems: a dead battery, blocked airflow, a spent coil, or e-liquid run too low. Check the charge and airflow first.
Cover the mouthpiece with your finger and pull gently. No resistance means air is escaping, often a loose pod. A tight or blocked draw means the airflow hole or mouthpiece is clogged.
Burnt Taste and Spitback: Coil and Pod Problems
A burnt taste means the coil is dry or worn. Spitback, where hot liquid hits your tongue, usually means a flooded coil or wattage too high for the pod.
For a burnt taste, replace the coil or pod. The UWELL Caliburn G replacement coils and Caliburn G replacement pods are press-fit and quick to swap. For SMOK devices, the SMOK Acro replacement pods and Vaporesso XROS replacement pods are common fixes.


How to Clean a Vape Device: Contacts, Pods, and Airflow
Cleaning is the highest-value maintenance you can do, and where most people either skip the job or damage the device with the wrong method.
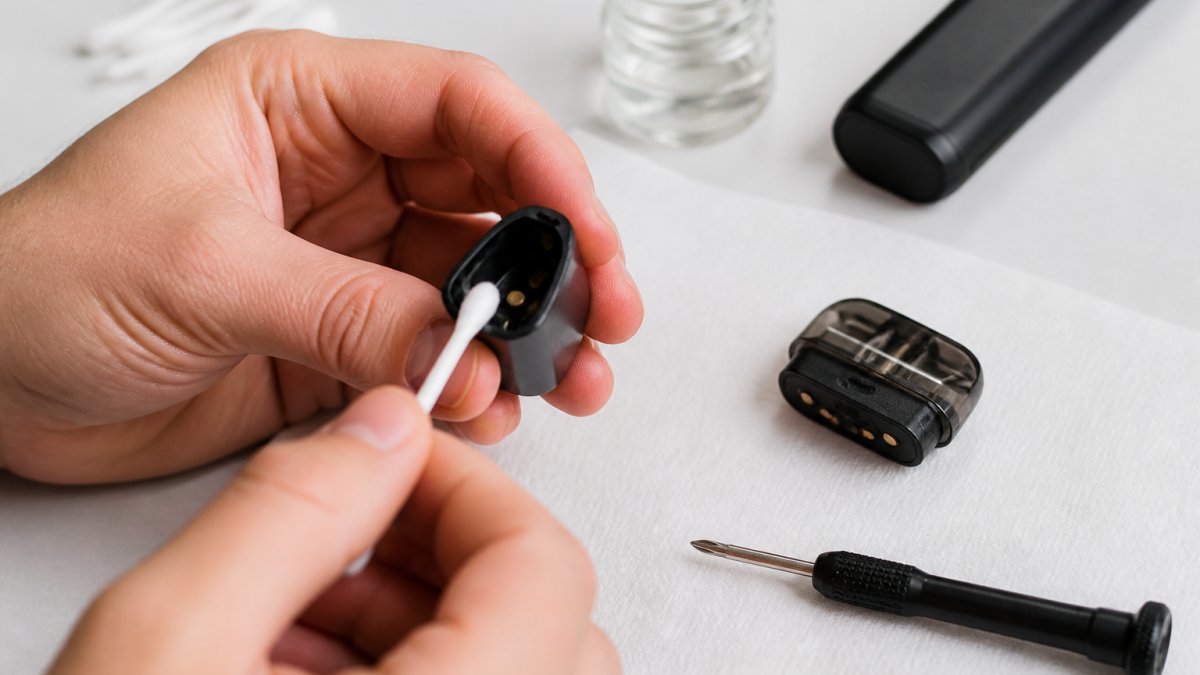
The safe cleaning method
- Remove the pod or tank and set it aside.
- Wipe the metal contacts on the battery and pod base with a dry cotton swab until no residue remains. A dark film is oxidation and must come off.
- Clear the airflow hole and mouthpiece with a dry swab. If removable, rinse the mouthpiece under warm water, dry it completely, and refit it.
- Dry any e-liquid around the connections fully; residue attracts dust and adds resistance.
- Reassemble and test the draw before refilling.
Never use water, alcohol, or cleaning fluid inside the battery housing or charging port. Moisture kills devices fast and can create a short. If your device has been exposed to liquid, follow the wet-device guidance below.
Device-type cleaning differences
- Disposable vapes. You cannot clean inside a sealed disposable. Wipe the mouthpiece and charging port only. If the draw is blocked or the taste has turned, the device is spent.
- Refillable pod systems. The pod base, battery contact, and airflow inlet matter most. Pull the pod weekly, wipe both contacts, and check the inlet for lint.
- Tank and mod devices. Clean the 510 connection on both tank and mod, wipe the tank threads, and check O-rings for flattening or cracks. A worn O-ring is a leak waiting to happen.
A simple maintenance schedule
| Task | Frequency | Why it matters |
|---|---|---|
| Wipe battery and pod contacts | Weekly | Prevents poor connections and error blinks |
| Clear airflow and mouthpiece | Weekly | Stops blocked draws and muted flavor |
| Check seals and O-rings for leaks | Weekly | Catches worn parts before they leak |
| Replace coil or pod | Every 1-2 weeks, or when flavor drops | Restores flavor, avoids burnt taste |
| Inspect battery for swelling or cracks | Monthly | Catches a safety issue early |
| Replace charging cable if worn | As needed | Avoids charging faults |
Storage and handling that prevent repeat problems
- Store devices upright with the pod or tank attached, so e-liquid sits against the coil rather than in the airflow path.
- Keep devices out of hot cars and direct sun. Heat thins e-liquid and raises pod pressure, pushing liquid through the seals.
- Cover or cap the charging port where the design allows, and keep devices out of pockets full of lint and keys.
After a device gets wet or overheated
If a device has been dropped in water, rained on, or left in a hot car, do not charge it to test it. Remove the pod or tank, shake out visible liquid, and air-dry completely at room temperature, not on a radiator or in an oven. Once dry, inspect the port and contacts. If submerged, do not use it again; internal corrosion and cell damage are not user-repairable.
Vape Leaking: Causes and Fixes for Pod and Tank Devices
A leaking vape is almost always overfilled, loosely assembled, or running a worn seal. Fix the fill level first, then the connections.
Overfilling is the most common cause, leave a small air gap at the top of the pod.
If a pod leaks repeatedly after reseating, the seal is worn and the pod needs replacing. Modern pods use anti-leak, side-fill designs that cut down on mess when filled correctly.
When to Stop Troubleshooting and Replace Your Device
Stop troubleshooting and replace the device if the battery is swollen, cracked, or gets hot during charging. These are safety issues, not maintenance issues.
Other signs it is time to replace rather than repair:
- The charging port is physically damaged or loose
- The device will not hold a charge after a known-good cable and block
- The body has cracks that expose the internal battery
For swollen or damaged batteries, do not keep using the device. Transport it safely and dispose of it through a proper battery recycling program rather than household waste.
Prevention and Maintenance Schedule for Your Vape
A simple weekly routine prevents most problems in this guide. Most issues we see come down to skipped maintenance, not faulty hardware.
| Task | Frequency | Why It Matters |
|---|---|---|
| Wipe battery and pod contacts | Weekly | Prevents poor connections |
| Clear airflow and mouthpiece | Weekly | Stops blocked draws |
| Replace coil or pod | Every 1-2 weeks | Restores flavor, avoids burnt taste |
| Check seals and for leaks | Weekly | Catches worn parts early |
| Inspect battery for damage | Monthly | Catches swelling or cracks |
| Replace charging cable if worn | As needed | Avoids charging faults |
If you are not sure what is wrong, bring the device in. Our team can test the charge, check the pod, and match you with the right replacement part on the spot. If we do not have something in stock, we will track it down for you.
Frequently Asked Questions
Why is my vape not charging even after I plug it in?
If your vape isn't charging, start by checking the charging port for dirt, lint, or residue. Use a dry cotton swab to gently clean inside the port. Try a different charging cable and power source to rule out a faulty cable or block. If the device still shows no charging light after 30 minutes, the internal battery may be damaged. A swollen or cracked battery is a safety concern and the device should be replaced rather than repaired.
Why is my vape not producing vapor?
Several things cause a vape to stop producing vapor. Check that the battery has enough charge, the pod or tank is filled with e-liquid, and the coil isn't burnt out. If the device uses a pod system, remove the pod and wipe the metal contacts on both the pod and the device. A loose pod connection or blocked airflow can also stop vapor production. If the coil tastes burnt, replace it with a fresh one.
How often should I clean my vape device?
Wipe the pod connection and battery contacts every time you refill or swap a pod, which is typically every few days. A deeper clean of the mouthpiece, airflow path, and charging port is worth doing once a week. If you notice leaking or a drop in flavor, clean immediately rather than waiting. Regular cleaning prevents residue buildup that leads to poor connections and weak vapor.
Why is my vape leaking and how do I stop it?
Leaking usually comes from overfilling the pod or tank, a loose or worn O-ring, or e-liquid getting into the airflow path. Fill only to the marked line and avoid letting the device sit on its side for long periods. If the pod is cracked or the coil is old, replace it. For pod systems, a new replacement pod often fixes persistent leaks. Check that the pod is fully seated in the device after each refill.
When should I replace a vape coil or pod?
Replace your coil or pod when you notice a burnt taste, reduced vapor production, or a noticeable change in flavor. Most coils last one to two weeks depending on how often you vape and the type of e-liquid you use. Sweet or dark e-liquids tend to wear coils faster. If cleaning the contacts and refilling doesn't restore performance, a fresh coil or pod is the next step.
Vape problems are frustrating, but most trace back to a handful of causes you can check in minutes. When a part genuinely needs replacing, Bay Roberts Vape and Glass Shop carries authentic UWELL, SMOK, and Vaporesso pods, coils, and chargers, plus a team that will diagnose the issue with you rather than guess. As the licensed Hoss Glass retailer in the area, we stand behind everything we sell. Get started with Bay Roberts Vape and Glass Shop and get your device hitting the way it should.