
How to Set Up Your First Vape Device
Table of Contents
- Understanding Your Vape Device Components
- How to Assemble Your Starter Kit
- How to Prime a Vape Coil
- Choosing E-Liquid Nicotine Levels for Beginners
- Vape Battery Safety Tips and Charging
- Your First Inhalation: Mouth-to-Lung vs Direct-to-Lung
- Maintenance, Troubleshooting, and Device Longevity
- Frequently Asked Questions
Last Updated: October 2, 2026
Understanding Your Vape Device Components
Before you assemble anything, you need to know what you're holding, understanding the basics of how to set up your first vape device starts here. A vape device has several key parts that work together to create vapor.
The battery is the power source. It stores energy and sends it to the heating element. Most modern devices use rechargeable batteries built inside the unit. The tank or pod holds your e-liquid.
Understanding these parts helps you maintain your device and troubleshoot problems later. Each component serves a specific purpose, and knowing what they do makes the whole process less intimidating.
How to Assemble Your Starter Kit
Most starter kits come partially assembled, and learning how to set up your first vape device involves just a few straightforward steps. You'll need to attach the tank to the battery and fill it with e-liquid. Here's the step-by-step process:
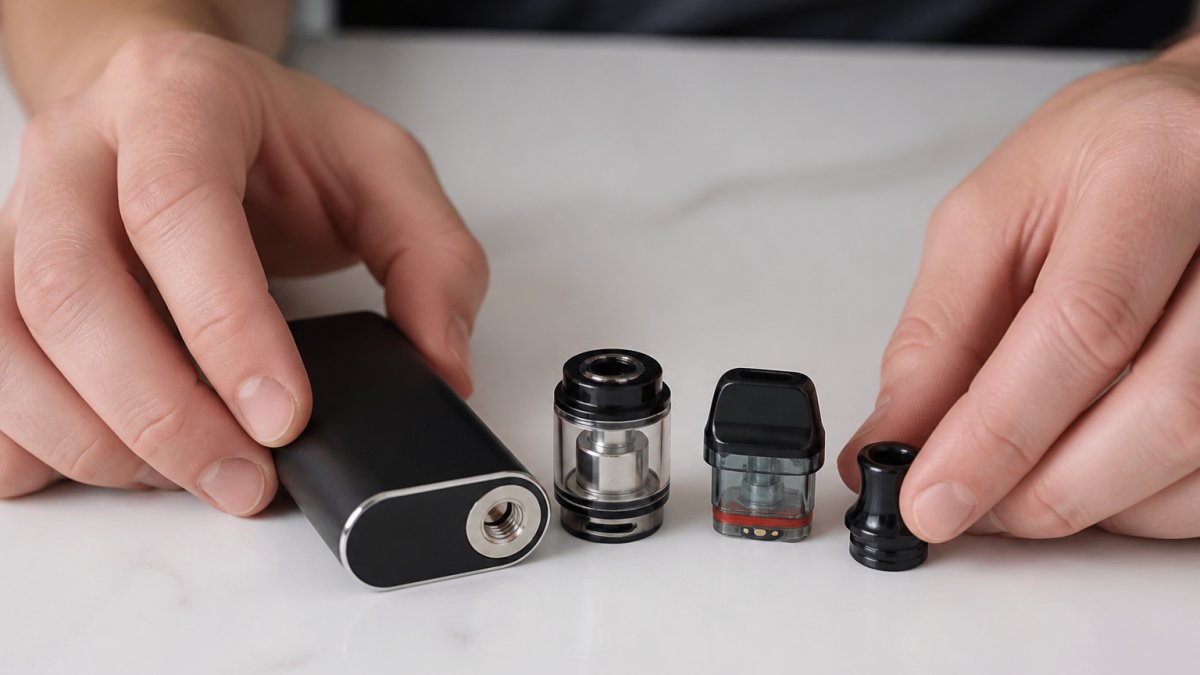
Step 1: Unpack Your Device Remove all components from the box. Check that you have the battery unit, tank or pod, replacement coils, and charging cable. Verify nothing is damaged.
Step 2: Charge Your Battery Connect the USB charging cable to your device's charging port.
Step 3: Insert the Coil Open your tank. Insert the replacement coil into the designated slot.
Step 4: Attach the Tank to the Battery Screw the tank onto the battery unit.
Step 5: Fill Your Tank Most tanks fill from the top. Remove the mouthpiece or top cap.
Step 6: Let It Sit Wait 5-10 minutes before vaping. This lets the e-liquid soak into the coil properly.
How to Prime a Vape Coil
Priming a coil means saturating it with e-liquid before you start vaping. This prevents dry hits, which taste burnt and damage the coil.
Here's how to prime correctly:
Method 1: Passive Priming (Recommended for Beginners) Fill your tank and let it sit for 5-10 minutes. The e-liquid wicks naturally into the coil during this time. This is the safest method and requires no extra steps.
Method 2: Active Priming After filling, gently squeeze e-liquid directly onto the visible coil (if your tank design allows it).
Method 3: Low-Power Puffs Set your device to low wattage if adjustable. Take 3-5 short puffs without inhaling deeply.
Most coils last 17-50+ puffs depending on quality and e-liquid type. Quality coils from brands like UWELL last significantly longer. The Uwell Caliburn G5 uses advanced AlphaCore coils rated for 17+ refills, which means you're not replacing coils constantly.

Choosing E-Liquid Nicotine Levels for Beginners
E-liquid comes in different nicotine strengths, measured in milligrams per milliliter (mg/mL).
Understanding Nicotine Strength:
- 0mg: No nicotine (flavor only)
- 3-6mg: Very light (experienced vapers, flavor-focused)
- 6-12mg: Light (some former smokers)
- 12-20mg: Medium (most former smokers, common starter level)
- 20mg+: High (heavy smokers, pod systems)
How to Choose Your Level: If you smoked a pack a day, start at 12-20mg.
Nicotine Titration for Beginners: Start with a moderate level and adjust after a week. If you crave more, increase slightly.
The type of device matters too. Pod systems and mouth-to-lung devices work better with higher nicotine.
Vape Battery Safety Tips and Charging
Your battery is the most important safety component. Treat it with respect. Understanding why safety rules exist helps you follow them consistently.
Why Battery Safety Matters: Most vape devices use lithium-ion batteries, the same technology in smartphones and laptops. Lithium-ion batteries can overheat, swell, or fail catastrophically if damaged, overcharged, or exposed to extreme conditions. Proper handling prevents thermal runaway, a chain reaction where the battery heats uncontrollably and can ignite.
Charging Best Practices:
- Use the cable and charger that came with your device. Third-party chargers may not match your device's voltage requirements and can overcharge the battery.
- Charge on a flat, non-flammable surface like a ceramic tile or glass table, never on carpet, fabric, or near curtains.
- Don't charge overnight or leave it unattended for extended periods. Ideally, charge during the day when you can monitor it.
- Avoid charging in extreme heat (above 40°C) or cold (below 0°C). Temperature extremes degrade battery chemistry and increase failure risk.
- Stop charging once the LED indicator shows full. Overcharging stresses the battery's internal chemistry and shortens lifespan.
- Never use a damaged charger. If the cable is frayed, the connector is loose, or the charger feels hot, replace it immediately.
Battery Care and Inspection:
- Keep your battery away from moisture and humidity. Water exposure can cause internal short circuits.
- Don't drop or physically damage your device. Even small dents can compromise the battery casing and internal structure.
- Store in a cool, dry place (15-25°C is ideal). Prolonged storage in heat degrades battery capacity permanently.
- Replace the battery if it swells, leaks, or stops holding charge. A swollen battery is a sign of internal failure and should not be used.
- Never attempt to repair a battery yourself. Lithium-ion batteries are sealed for safety; opening them risks explosion or chemical burns.
- Purchase replacement batteries only from authorized retailers or the device manufacturer. Counterfeit batteries lack safety certifications and are a fire hazard.
Understanding Battery Specifications: Battery capacity is measured in milliamp-hours (mAh). A 2000 mAh battery lasts longer between charges than a 1000 mAh battery, but also takes longer to charge.
Safety Precautions:
- Don't leave your device in direct sunlight for extended periods. UV exposure and heat degrade the battery and can warp plastic components.
- Avoid exposing it to temperatures above 60°C (such as in a hot car or near a heater).
- Keep it away from children and pets. Batteries and e-liquid are toxic if ingested.
- Never attempt to modify or rewrap a battery. The protective wrap prevents short circuits; a damaged wrap is a fire risk.
When to Replace Your Battery: Most built-in batteries degrade naturally over 300-500 full charge cycles (roughly 1-2 years of regular use).
Your First Inhalation: Mouth-to-Lung vs Direct-to-Lung
There are two main inhalation techniques. Understanding the difference changes your experience.
Mouth-to-Lung (MTL): This mimics smoking a cigarette. You draw vapor into your mouth first, hold it briefly, then inhale into your lungs.
Direct-to-Lung (DTL): You inhale vapor directly into your lungs in one motion. DTL produces bigger clouds and uses more e-liquid.
Which Should You Choose? Most beginners start with MTL. It's gentler, feels familiar, and works with higher nicotine levels. Devices like the Uwell Caliburn Air Kit are designed specifically for MTL vaping with draw-activated technology and no buttons to press.

Your First Session:
- Take a slow, steady puff for 3-5 seconds
- Hold vapor in your mouth for 1-2 seconds
- Inhale into your lungs gently
- Exhale smoothly
- Wait 30 seconds before your next puff
Don't rush. Start with short sessions. Your body needs time to adjust.
Maintenance, Troubleshooting, and Device Longevity
Regular maintenance keeps your device working and tasting fresh.
Weekly Maintenance:
- Wipe the outside with a dry cloth to remove condensation and dust.
- Check for leaks around the tank connection. Small leaks often indicate a loose seal or worn O-ring.
- Inspect the mouthpiece for buildup or discoloration, which signals old e-liquid residue.
- Ensure the battery connection (where tank meets battery) is clean and dry. Debris here causes poor electrical contact and weak vapor production.
Monthly Tasks:
- Deep clean the tank by disassembling it completely.
- Rinse all components except the battery in warm (not hot) water. Avoid submerging the battery unit.
- Dry completely before reassembling. Any moisture left inside causes corrosion and leaks.
- Replace the coil if flavor is declining noticeably. A burnt or muted taste is the clearest sign a coil is exhausted.
Common Issues and Fixes:
| Problem | Cause | Solution |
|---|---|---|
| Dry hit (burnt taste) | Coil not primed or saturated | Prime coil properly, wait 5-10 minutes before vaping |
| Leaking | Overfilled tank or cracked seal | Empty tank slightly, check O-rings for cracks, reseat tank firmly |
| No vapor | Dead battery or flooded coil | Charge device fully or let coil dry for 30 minutes |
| Weak flavor | Old coil or low battery | Replace coil or charge battery to full capacity |
| Gurgling | Too much e-liquid in coil | Tap tank gently, blow through mouthpiece to remove excess |
| Spitback (hot liquid in mouth) | Coil oversaturated or firing too long | Use shorter puffs, let coil cool between sessions, replace coil |
Device Longevity and Coil Lifespan: Quality devices last 1-3 years with proper care.
Store your device in a cool, dry place when not in use.
Environmental Disposal and Recycling: Vape devices contain lithium-ion batteries and electronic components that require responsible disposal.
How to Recycle Your Device:
- Contact your municipality's hazardous waste program. Search "[your city] hazardous waste" or visit your local waste management website.
Pod and Coil Disposal: Disposable pods and replacement coils contain small amounts of e-liquid residue and metal components.
Frequently Asked Questions
How do you properly prime a new vape coil?
Priming prepares the coil's heating element to absorb e-liquid evenly, preventing dry hits. After installing a fresh coil, saturate the wicking material by dripping 3-4 drops of e-liquid directly onto the coil's exposed cotton. Let it sit for 5-10 minutes before vaping. Fill your tank and wait another 5 minutes. Start with low wattage (around 15W) on your first few puffs to ensure the coil is fully saturated. Skipping this step risks burning the coil and ruining the flavor.
What is the difference between mouth-to-lung and direct-to-lung vaping?
Mouth-to-lung (MTL) mimics smoking: you draw vapour into your mouth first, then inhale it into your lungs. It works best with higher nicotine strengths and produces less vapour. Direct-to-lung (DTL) pulls vapour straight to your lungs in one motion, producing denser clouds and requiring lower nicotine levels. Beginners transitioning from cigarettes typically prefer MTL because it feels familiar and delivers nicotine more efficiently.
How do I choose the right e-liquid nicotine strength for beginners?
Nicotine strength depends on your smoking history and vaping style. Former heavy smokers often start with 18-20mg nicotine in MTL devices. Light smokers or those using DTL systems might begin at 6-12mg. Pod systems like the Caliburn G5 work well with 10-20mg. Start conservatively: you can always increase later, but too much nicotine causes nausea and headaches. Most beginners find their sweet spot within their first week of experimenting.
Are there specific safety precautions for charging vape batteries?
Always use the USB charger included with your device or a reputable replacement. Charge on a flat, non-flammable surface away from bedding or curtains. Never leave batteries charging unattended overnight. Avoid using damaged cables or chargers from unknown sources. Most modern devices like the Caliburn G5 have built-in protection circuits, but inspect your battery regularly for dents or damage. If a battery feels hot during charging or the device won't charge, stop using it immediately.
Setting up your first vape device doesn't have to be complicated. Follow these steps, prime your coil properly, and choose the right nicotine strength for your needs. Bay Roberts Vape and Glass Shop carries quality starter kits from trusted brands, and our team can help you select the right device for your situation. Whether you visit in person or browse online, we're here to guide you through every step. Get directions to our shop and let us help you find the perfect starter kit today.